Difference between revisions of "Crack Mansion"

From Hellmoo Wiki Archive
Jump to navigation Jump to search
imported>Benthic
(hahahaha i hope this doesn't ruin everything :I)
imported>Isadora
m (Added a disambiguation note with links to clarify the difference between the crack house and crack mansion.)
 
(8 intermediate revisions by 5 users not shown)
Line 1: Line 1:
The beefalo munches a bit of lichen from between the rocks.
''Not to be confused with the [[Crackhouse]], a slightly harder zone with similar mobs in [[Gangland]].''


The '''Crack Mansion''' is a house in central [[Freedom City]], populated by hapless drug addicts mostly used for newbie grinding and fodder for [[jobs]]. A couple minor loot chests also spawn here.


===Mobs===
[[Image:Krackmansion.png|thumb|right|The first floor]]
* There are three mob varieties here. From weakest to strongest: crackbabies, crackheads and crackfiends. All are weak, though crackfiends and crackheads may trump extremely low level players. Crackbabies are as harmless as the toddlers they are.
** Crackheads are useful for many [[jobs]]. They can be {{cmd|scam}}med for Scam Artist, show up as targets for Hitman, given crank to satisfy Pusherman, collared for Slave Driver, and stuck with gene ampules from [[Weezer_Dam|Weezer]].
* Propecia is the area's benign boss mob, at the far north of the second floor. She carries a [[nanite healer]] which you can kill her for. She is a weaker version of the babymommas in [[Gangland]], but stronger than the crackheads. Give her food, and she'll let you {{cmd|fuck}} her, which will spawn a monster baby.


The '''Crack Mansion''' is a large crackhouse in central [[Freedom City]], commonly used as a grinding area by low level players. The Crack Mansion features an assortment of weak monsters, including [[crackheads]], [[crackbabies]] and [[crackfiends]], as well as several respawning loot containers.
===Features===
[[Image:Cm2.png|thumb|right|The second floor]]
The Crack Mansion has three floors; a large lower floor, a large second floor, and a single-tile rooftop.
* The first floor has a bathtub in the bathroom to the east which respawns a small amount of alcohol continually.
* The second floor has three chests which respawn goodies: A crate to the northwest which spawns random junk, a footlocker to the southwest which spawns two random clothing items, and a box to the southeast which spawns a [[trauma kit]] of varying size.
* The single-tile rooftop is also a small airplane landing tile. [[Hideous_Freak|Freaks]] can land here and enter the mansion without attracting police attention, and (hilariously enough) even complete Pusherman if they hand the rocks out fast!
* This location is a target for bombing in a quest for Fat Ratzo in [[Any Port]]. This quest is rarely done, but when it does happen you'll get blown up if you're inside! The mansion can also be dangerous in PvP, being a yellow zone right inside the extremely high-traffic [[Freedom City]].
* The tiles of this zone can be scavenged for lots and lots of crap, and the occasional 30-dose crank rock. These rocks can be broken down into 16 rocks in total, enough for three Pusherman [[job]] completions and a free sample!


Recent changes to [[contracts]] have made the Crack Mansion a less crowded area, but it remains popular and accessible to all characters.
[[Category:Areas]]
 
==Layout==
[[Image:Krackmansion.png|thumb|right|]]
The Crack Mansion has 3 floors; a large lower floor, a large 2nd floor, and a single-tile outdoor rooftop.
 
===First Floor===
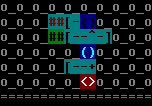
The first floor (pictured) has it's entrance in the southmost tile. This entryway is the only way in or out of the Crack Mansion, barring the use of certain [[Mutations]] or portals. The easternmost tile features a gin tub, which contains a respawning quantity of alcohol. Doors connect the two western tiles (the porch and yard) to the mansion proper. The tile to the immediate west of the gin tub contains the mansion's main and only staircase and entrance to the upper floors.
 
===Second Floor===
 
 
==Strategies==
===Speed Options===
*Captain Falcon has the fastest dash speed in the game. Reaching an item before your opponent shouldn't be a problem unless he or she is significantly closer to the item.
 
*Captain Falcon's aerial game is very fast, making performing combos fairly easy. His knee is a good KO move at medium-high damage. He also has one true [[spike]]. Use that as a follow-up in case the knee doesn't work, or to continue comboing.
 
*Because Falcon's [[Falling Speed]] and weight are so high, He is the character that is most resistant to [[Star KO|vertical knockouts]].
 
*Since he is a heavy character and a fast faller, attacks like Peach's down smash can be horrible against Falcon.
 
===Ground Options===
*Captain Falcon's ground attack's have some lag, but, in return, they generally have good knockback and damage. Captain Falcon's up smash hits twice which can KO at low percentages. His side smash is a little laggy, but has great range and knockback. His down smash is two kicks which hit both sides of Falcon so opponents on either side of him will be hit so long as they are within range.  In addition, his down smash has a very good reach and priority.
*Falcon's tilts include his forward tilt, a long ranged kick with decent damage and knockback, his down tilt, a sweeping kick which sends opponents upwards, and his up tilt, where he lifts his leg in the air and smashes it down. The up tilt is frequently used for edgeguarding.
 
===Air Options===
*Forward Aerial "The knee" - Captain Falcon's forward aerial is a great finisher. Timed at the end of grab and aerial combos, it can KO opponents at about 60%. However it requires precise timing to land, since a non sweetspotted hit will be very weak.
*Back Aerial - A backhand hit with a fair amount of startup lag. Falcon's Bair is excellent, especially for edgeguarding. While an opponent is off stage it is common to hop backwards and intercept them with a Bair for the KO.
*Neutral Aerial - Two fast kicks. The Neutral aerial is good for racking up damage.
*Up Aerial - A quick back-flip kick. Good for attacking airborne opponents as it is fast and relatively strong, and has a long duration making it comparatively easy to land.
*Down Aerial - An airborne stomp. Falcon's Dair has a considerable amount of startup lag. It is, however, a good spike when timed correctly, and is also good for use on the ground where it will send opponents upwards, sometimes knocking them off at high percentages. It can also nipple spike.
 
===Projectile/Protecting===
*Although Captain Falcon is good in the air and ground, he has no projectiles or ways to effectively deal with projectiles, which makes him vulnerable to campers with long range. Items like [[Ray Gun]]s can help, but you shouldn't become overly reliant on items because they will run out of juice.
 
*Using Falcon's [[Raptor Boost]] is a good way to dodge oncoming projectiles like [[Samus]]'s [[Missile]] or [[Mario]]'s [[Fireball]].
 
*Falcon has a quick, long backwards roll, arguably the best in the game.  His forward roll is good too, so he can easily roll right past attackers.
 
===Grabs===
Captain Falcon has some good grabs that are used to start chains and combos, most notably into his fair, which can allow for quick kills. 
====Down Throw====
*Can chain-grab many characters with average falling speeds and weights at various percents. Simply down-throw, follow the opponent's DI with a dash, and use a Jump Cancelled Grab to grab again. If the opponent DIs towards the player, a re-grab in place or turning and re-grabbing may be possible.
*combos into N-air at most percents and DIs against non-fastfallers.
*Can combo into a f-air at medium to high percents against non-fastfallers. This may be escapable at some percents with DI. This is also an option at very high percents against fast-fallers.
*Tech-chasing chain grabs are possible as well against fast-fallers. Additionally, one can Tech-chase with Isai Stomps and Raptor Boost. Down-smash is additionally useful as it hits in front of and behind C.F., hitting 2/3 tech-rolls and hitting non-techs if properly timed.
====Up Throw====
* Combos into an N-air, U-air, and F-air at various percents and DIs against virtually every character. The higher the percent, the more chance opponents have to break free.
*Combos into D-tilt at low-medium percents against fast-fallers.
*Combos into F-Smash and D-Smash against fast-fallers at medium percents, depending on DI.
*Against fast fallers at low percents, does not combo directly but leads to Tech-chasing.
*Combos into a Up-smash against fast-fallers that do not DI to a side. Against large, heavy characters, can be wavedashed into at several DIs.
*Can combo into an angled F-tilt depending on DI. Useful for catching awkward DIs and percents.
*If an opponent bounces, it is possible to hit them with any SHFFL'd aerial, a down-smash, Raptor Boost, Falcon Kick, Falcon Punch, and any tilts out of the bounce.
*Raptor Boost is always an option, and directly combos against many characters at low percents and against most DIs, however is known to be very touchy and avoidable. Can be used to tech-chase as well.
*Up throw can lead to a dashing, jump-cancelled re-grab against Fox at very high percents (approximately 110%) if the opponent DI's away. This is possible due to to Fox's light weight and high downward acceleration.
 
==Trophy Descriptions==
In addition to his normal trophy, there are two trophies about him as a fighter, unlocked by completing the Adventure and All-Star modes respectively with Captain Falcon on any difficulty:
 
[[File:Captain Falcon smash trophy (SSBM).jpg|thumb|97px]]
 
:'''Captain Falcon''' ''(Smash Red)''
:''Falcon's style is a balanced combination of raw power and speed. His attacks are slow, but when combined with Falcon's high mobility, he's a formidable combat force. The Falcon Punch packs the highest degree of destructive power, while the explosive Raptor Boost can be used to smash airborne foes into the depths.
:*B: [[Falcon Punch]]
:*Smash B: [[Raptor Boost]]''
[[File:Captain Falcon smash 2 trophy (SSBM).jpg|thumb|88px]]


:'''Captain Falcon''' ''(Smash Blue)''
:''The Knee Smash, used in midair on foes in front of you, is slow and has a short reach, but if it connects, it'll send foes flying a long way on a low trajectory. Falcon uses his Falcon Dive to grab an enemy in midair and fling them away with an explosive blast. He can do this technique repeatedly without landing, so it can also be used as a recovery move.
:*Up & B: [[Falcon Dive]]
:*Down & B: [[Falcon Kick]]''
 
<br />
 
==Costume Gallery==
[[image:alt-cfalcon2.jpg|frame|center|Captain Falcon's changeable clothing in SSBM]]
{{SSBMCharacters}}
{{F-Zero}}

Latest revision as of 06:47, 15 January 2019

Not to be confused with the Crackhouse, a slightly harder zone with similar mobs in Gangland.

The Crack Mansion is a house in central Freedom City, populated by hapless drug addicts mostly used for newbie grinding and fodder for jobs. A couple minor loot chests also spawn here.

Mobs

The first floor
  • There are three mob varieties here. From weakest to strongest: crackbabies, crackheads and crackfiends. All are weak, though crackfiends and crackheads may trump extremely low level players. Crackbabies are as harmless as the toddlers they are.
    • Crackheads are useful for many jobs. They can be scammed for Scam Artist, show up as targets for Hitman, given crank to satisfy Pusherman, collared for Slave Driver, and stuck with gene ampules from Weezer.
  • Propecia is the area's benign boss mob, at the far north of the second floor. She carries a nanite healer which you can kill her for. She is a weaker version of the babymommas in Gangland, but stronger than the crackheads. Give her food, and she'll let you fuck her, which will spawn a monster baby.

Features

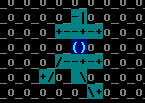
The second floor

The Crack Mansion has three floors; a large lower floor, a large second floor, and a single-tile rooftop.

  • The first floor has a bathtub in the bathroom to the east which respawns a small amount of alcohol continually.
  • The second floor has three chests which respawn goodies: A crate to the northwest which spawns random junk, a footlocker to the southwest which spawns two random clothing items, and a box to the southeast which spawns a trauma kit of varying size.
  • The single-tile rooftop is also a small airplane landing tile. Freaks can land here and enter the mansion without attracting police attention, and (hilariously enough) even complete Pusherman if they hand the rocks out fast!
  • This location is a target for bombing in a quest for Fat Ratzo in Any Port. This quest is rarely done, but when it does happen you'll get blown up if you're inside! The mansion can also be dangerous in PvP, being a yellow zone right inside the extremely high-traffic Freedom City.
  • The tiles of this zone can be scavenged for lots and lots of crap, and the occasional 30-dose crank rock. These rocks can be broken down into 16 rocks in total, enough for three Pusherman job completions and a free sample!